Our Location
304 North Cardinal St.
Dorchester Center, MA 02124
304 North Cardinal St.
Dorchester Center, MA 02124

Get hands-on with your next DIY project by learning how to install WPC solid wood composite terrace boards yourself. Find easy-to-follow instructions and expert advice.
Welcome to our comprehensive guide on installing WPC (Wood Plastic Composite) solid wood composite terrace boards. Whether you’re looking to refresh your outdoor space or are embarking on a new project, this guide is tailored for DIY enthusiasts who want to undertake the installation themselves. We’ll provide you with clear, step-by-step instructions, essential safety tips, and a list of necessary tools and materials. Additionally, we’ll highlight common pitfalls and offer advice on how to avoid them.
To start, gather all the tools and materials you will need for the installation process. The following items are essential:
Ensure that you have high-quality WPC terrace boards. These boards are made from a mixture of wood fibers and plastic, making them highly durable and resistant to weathering, rot, and insects. This material is ideal for creating a beautiful and functional outdoor living space.
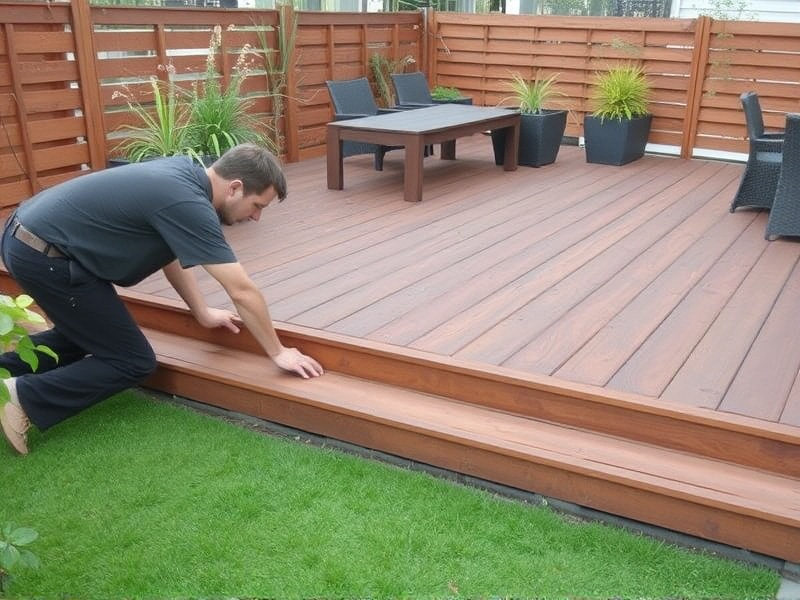
The first step in installing WPC terrace boards is to prepare the surface where they will be laid. Ensure that the ground is level and free from debris. If necessary, use a concrete screed to create a smooth, even base. Mark out the area using a marker or chalk line to ensure straight lines and accurate measurements.
Using a jigsaw or circular saw, cut the WPC boards to the desired length. It’s important to make clean cuts to ensure a proper fit. Measure twice and cut once to avoid mistakes. If you’re not experienced with power tools, consider renting or borrowing one from a local hardware store.
Begin by laying the first board along the marked line. Secure it in place using concrete screws or deck screws. Use a screwdriver or drill to drive the screws into the board, ensuring they are evenly spaced and driven at an angle to allow for expansion and contraction due to temperature changes. Continue laying and securing the boards, working your way across the terrace. Use a level to check that each board is installed correctly and adjust as needed.
When working with power tools and building materials, safety should always be a priority. Wear gloves and safety goggles to protect yourself from cuts and flying debris. Ensure that your work area is well-lit and free from obstacles to prevent trips and falls. Always follow the manufacturer’s instructions for tool usage and maintenance.
One common pitfall when installing WPC terrace boards is failing to account for expansion and contraction. To avoid this, leave a small gap between each board and ensure that screws are driven at an angle. Another issue can be uneven surfaces; always take the time to level the ground before starting the installation process. Finally, don’t skimp on quality materials; using inferior products can lead to premature wear and tear.
Installing WPC terrace boards is a rewarding DIY project that can enhance your outdoor living space. By following these steps and taking the necessary precautions, you can achieve a professional-looking result. Remember to plan ahead, use quality materials, and prioritize safety throughout the process.
